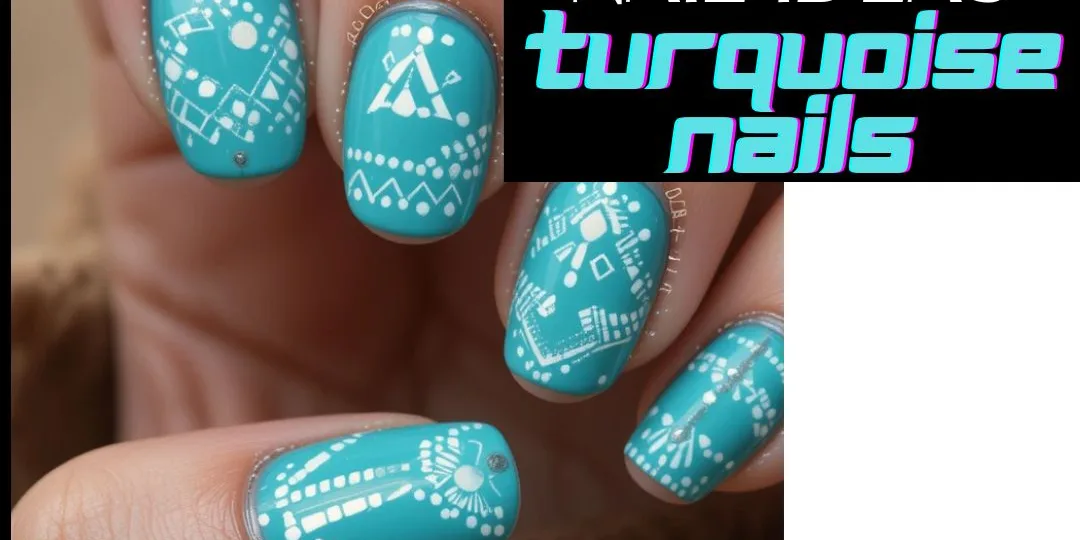
Looking for a nail art look that’s vibrant, cultural, and easy to DIY? Turquoise patterned nails inspired by Native American and Southwestern jewelry offer a perfect blend of color and artistry. This tutorial walks you through everything, from tools to applications, in under 15 minutes.
Turquoise is more than just a pretty color. It represents calm, creativity, and cultural richness. Drawing inspiration from Native American jewelry, these nails blend turquoise’s bright yet earthy vibe with clean white and silver geometric accents for a look that’s both bold and meaningful.
Clean your nails with polish remover to remove oils. Shape and buff them, then apply a base coat. This keeps your nails from staining and helps polish last longer.
Apply two thin coats of turquoise polish for full opacity. Let each coat dry before adding the next. The color should resemble Southwestern gemstones, rich, cool, and vibrant.
Use white polish and a thin brush or toothpick to draw small, simple shapes on 2–3 nails per hand. Try chevrons, diamonds, or triangles. Less is more; keep it minimal for a clean, modern look.
Add silver dots or thin lines to one or two nails (like the thumb or ring finger) for an accent. Alternatively, apply pre-made geometric stickers for precision and ease.
Dip a small brush or Q-tip in polish remover and clean around your cuticles and nail edges. This step makes your art look sharp and professional.
Finish with a matte top coat to enhance the rustic, hand-painted vibe. Apply evenly and cover the tips to prevent chipping. Let it dry completely.
If drawing isn’t your strength, opt for nail stickers. They come in tribal and geometric patterns and are super easy to apply, just press and seal.
Want extra durability? Use gel polish instead. Cure each layer under a UV/LED lamp for a manicure that lasts 2–3 weeks without chipping.
This turquoise pattern nail design is more than just pretty, it’s personal, expressive, and incredibly doable at home. With just a few tools and a bit of patience, you can create a look that feels fresh, artistic, and grounded in cultural beauty. Whether you’re new to nail art or a seasoned pro, this design is a guaranteed showstopper.
1. How long does it last?
7–10 days with regular polish, up to 3 weeks with gel.
2. Is this beginner-friendly?
Yes! Simple shapes and optional stickers make it easy for all skill levels.
3. Can I use a glossy top coat?
You can, but matte gives it a more rustic, handcrafted feel.
4. What if I don’t have a nail art brush?
Use a toothpick, bobby pin, or the tip of a clean pen.
5. Can I apply this to press-on nails?
Absolutely. Design them first, then glue them on when dry.
View all

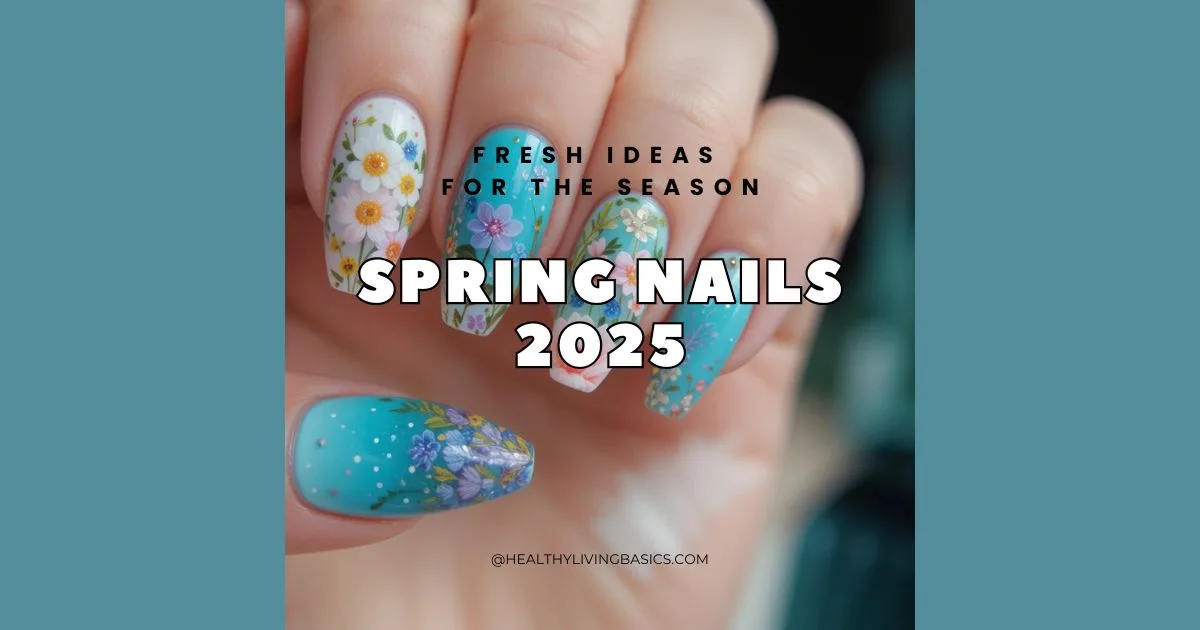
March 16, 2025 | by Eleanor Sage
May 5, 2025 | by Eleanor Sage